Path A - Generate Token for a Direct Install App
Use this guide after creating the app from dev.shopify.com/dashboard, when that app can be installed directly in your target store.
In this flow, the app is installed directly from the app itself. If your app shows a Distribution section/card or requires Custom Distribution, stop here and use Path B - Generate Token for a Partner-Linked App instead.
Note that this process requires a live domain; local environments (localhost) are not supported. If you are using an on-premise server, make sure that a database filter is applied in the Odoo configuration file.
Important:
- Shopify Connector version should be 17.0.7.1 or higher to use this method.
- Open the Odoo wizard first and keep it open throughout the entire process. Do not close it until the token is generated.
1. Initial Setup in Odoo
- Install the Shopify Connector module.
- In Odoo, go to Shopify → Configuration → Settings and click Set Shopify Authorization Details to open the wizard.
-
The wizard displays two URLs in the App Integration URLs section — the App URL and the Callback / Redirect URL.
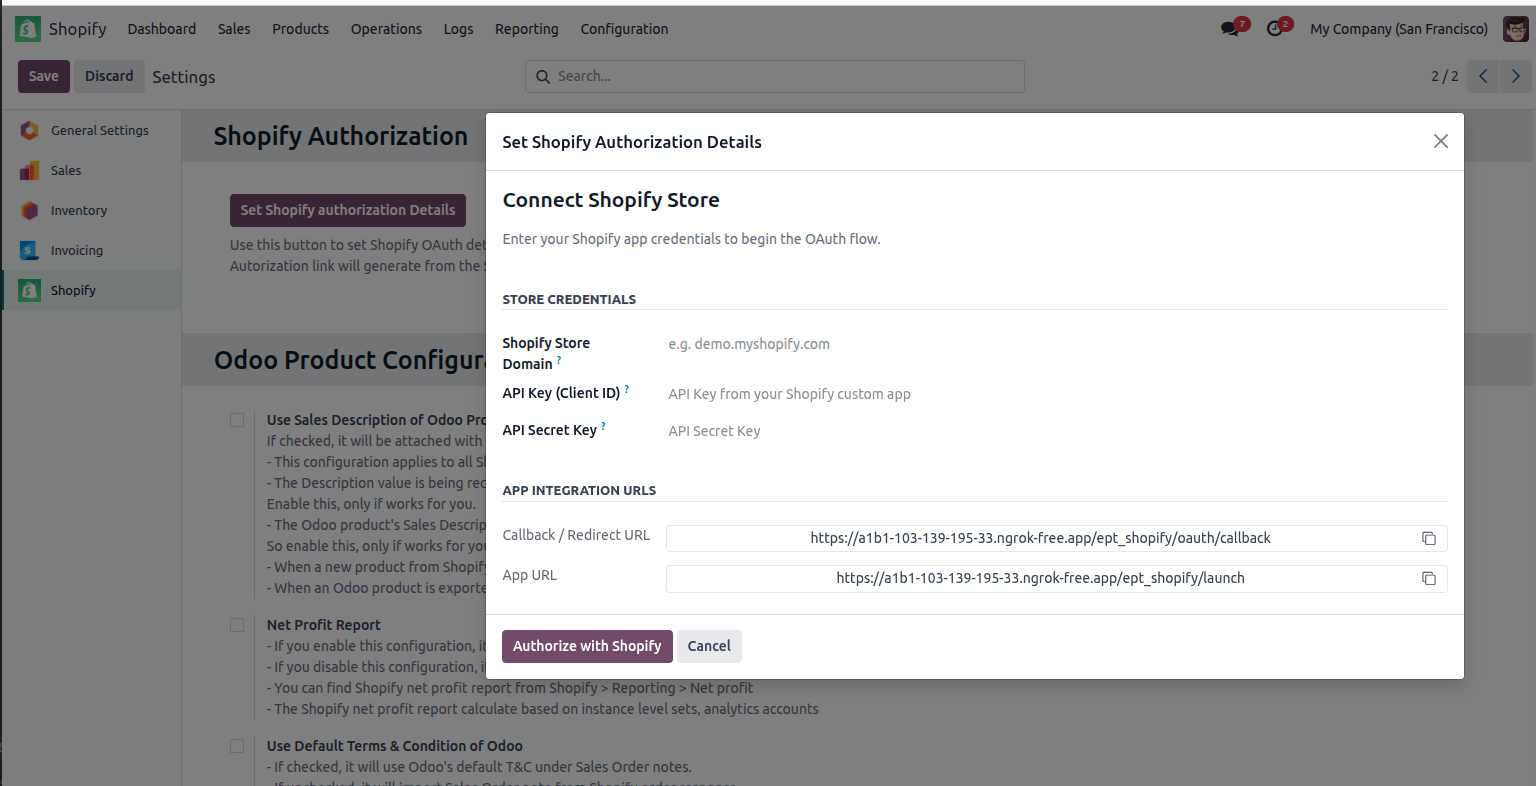
- Keep this window open. You will need both URLs in the next steps.
2. Confirm You Are in the Direct Install Flow
Before continuing, verify that your app can be installed directly and does not show a Distribution section/card.
If a Distribution section/card appears, switch to Path B - Generate Token for a Partner-Linked App.
3. Create a Version and Set URLs
- Inside the app, go to Versions and click Create version.
- In the App URL field, paste the App URL copied from the Odoo wizard.
-
In the Redirection URL(s) field, paste the Callback / Redirect URL copied from the Odoo wizard.
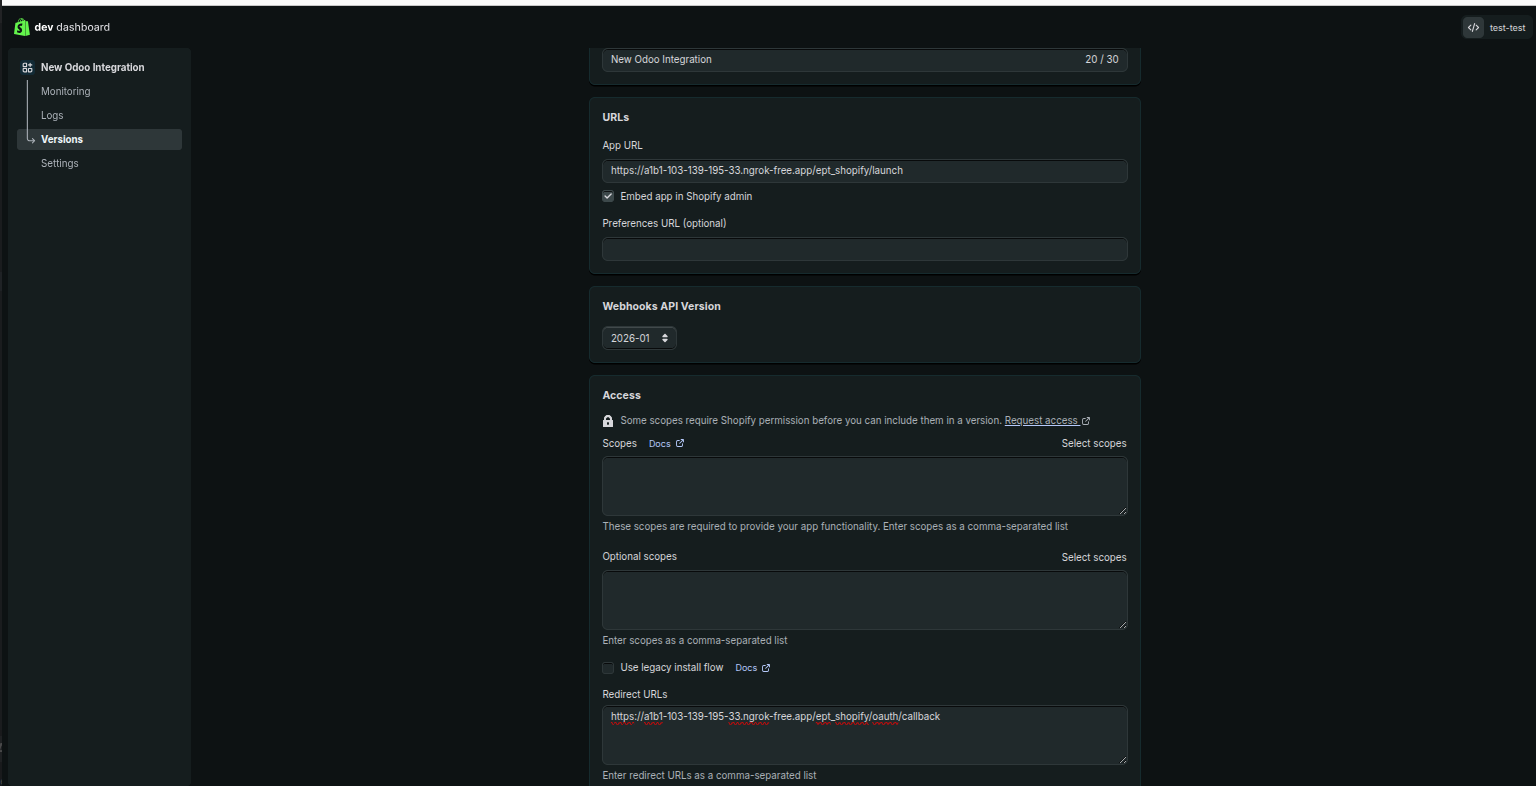
Note: Copy both URLs exactly as shown in the Odoo wizard. Any mismatch — including a trailing slash — will cause the authorization to fail.
4. Set API Scopes
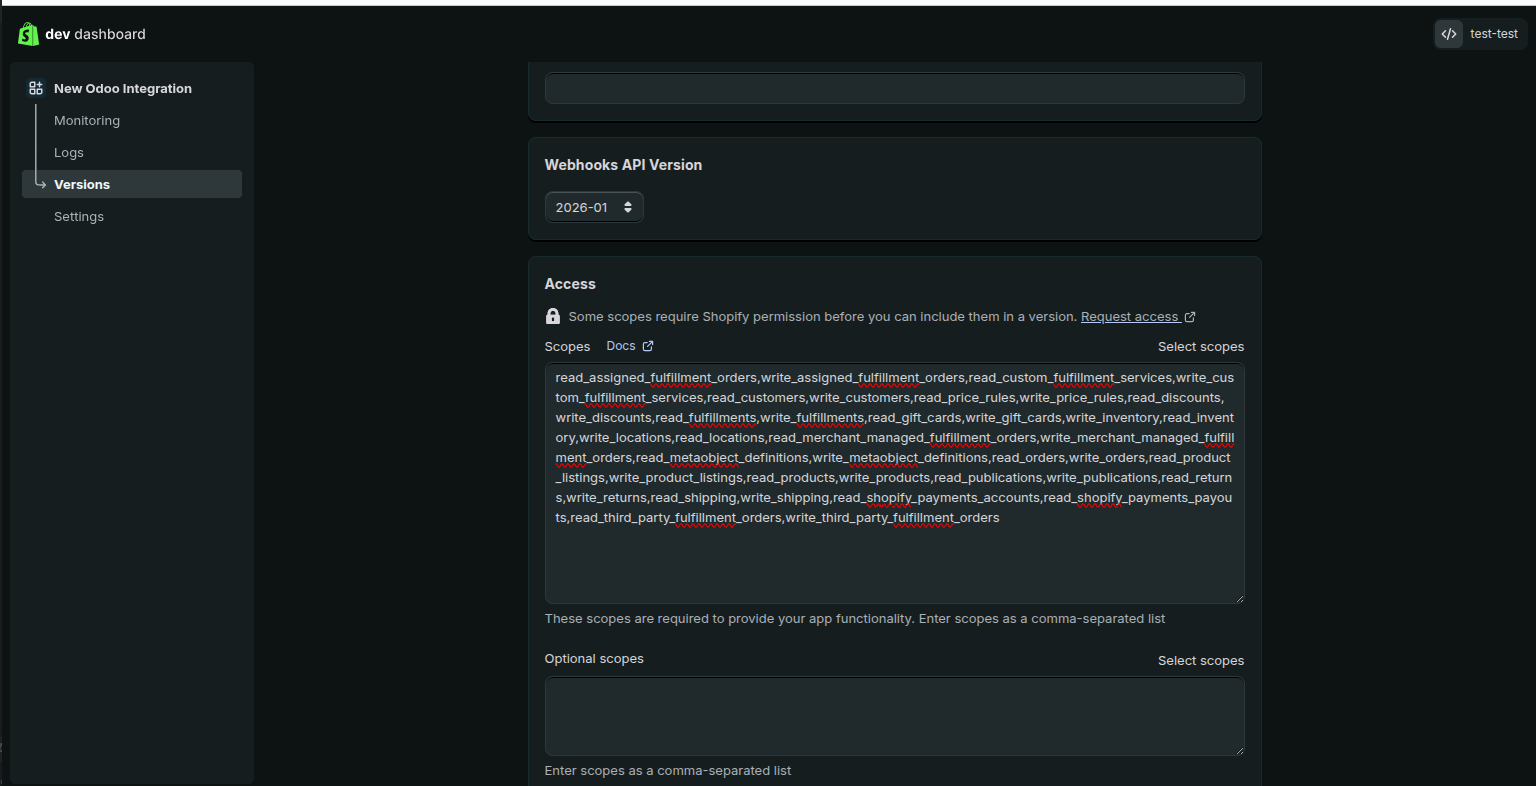
Copy the following string exactly and paste it into the Access Scopes field of your app version:
read_assigned_fulfillment_orders,write_assigned_fulfillment_orders,read_custom_fulfillment_services,write_custom_fulfillment_services,read_customers,write_customers,read_price_rules,write_price_rules,read_discounts,write_discounts,read_fulfillments,write_fulfillments,read_gift_cards,write_gift_cards,write_inventory,read_inventory,write_locations,read_locations,read_merchant_managed_fulfillment_orders,write_merchant_managed_fulfillment_orders,read_metaobject_definitions,write_metaobject_definitions,read_orders,read_all_orders,write_orders,read_product_listings,write_product_listings,read_products,write_products,read_publications,write_publications,read_returns,write_returns,read_shipping,write_shipping,read_shopify_payments_accounts,read_shopify_payments_payouts,read_third_party_fulfillment_orders,write_third_party_fulfillment_orders,write_order_edits,read_order_edits,write_locales,read_locales,write_translations,read_translations
Note: All scopes listed above are required. The token will only work for permissions that are explicitly set on the released app version.
5. Release the Version
- Confirm that the App URL, Redirect URL, and all required scopes are correctly entered.
- Click Release version.
Note: The version must be released before the app can be used to authorize Odoo.
6. Install the App in Your Shopify Store
- Open the same app in the Shopify developer dashboard.
- Use the direct install option shown for the app and install it in your store.
- Confirm the installation when Shopify asks for approval.
Note: If you do not see a direct install option and Shopify shows a Distribution section/card instead, you are in the partner-linked flow. Use Path B - Generate Token for a Partner-Linked App.
7. Copy Credentials into the Odoo Wizard
- In the Shopify developer dashboard, open your app and go to Settings.
- Copy the Client ID and paste it into the API Key (Client ID) field in the Odoo wizard.
- Copy the Client Secret and paste it into the API Secret Key field in the Odoo wizard.
-
Enter your store domain in the Shopify Store Domain field, for example
demo.myshopify.com. Do not includehttps://.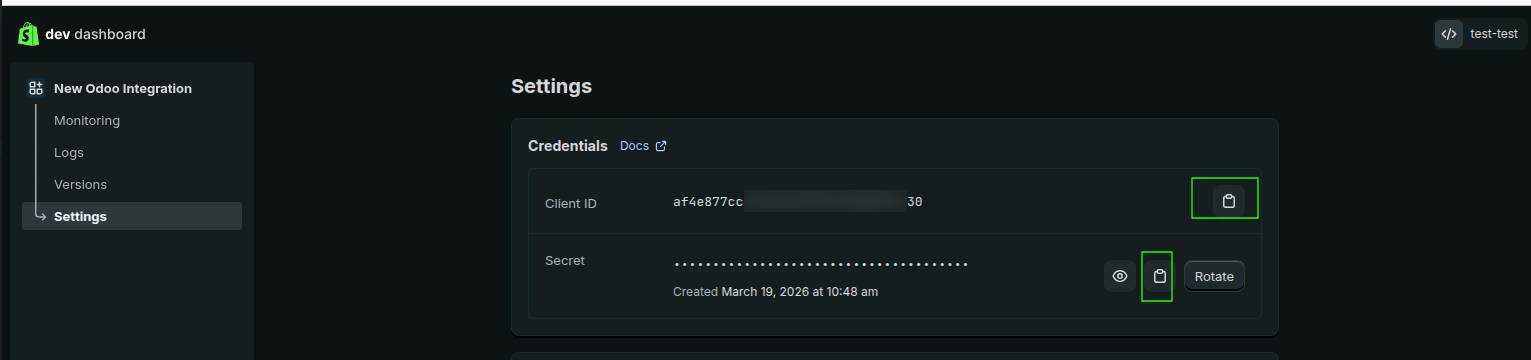
8. Authorize and Generate the Token
- Switch back to the Odoo wizard.
- Click Authorize with Shopify.
- Your browser will redirect to the Shopify authorization screen.
- After approval, you will be redirected back to Odoo automatically. If the Odoo login page appears, log in — the wizard will reopen on its own.
-
The wizard switches to the Token Generated view and displays your access token.
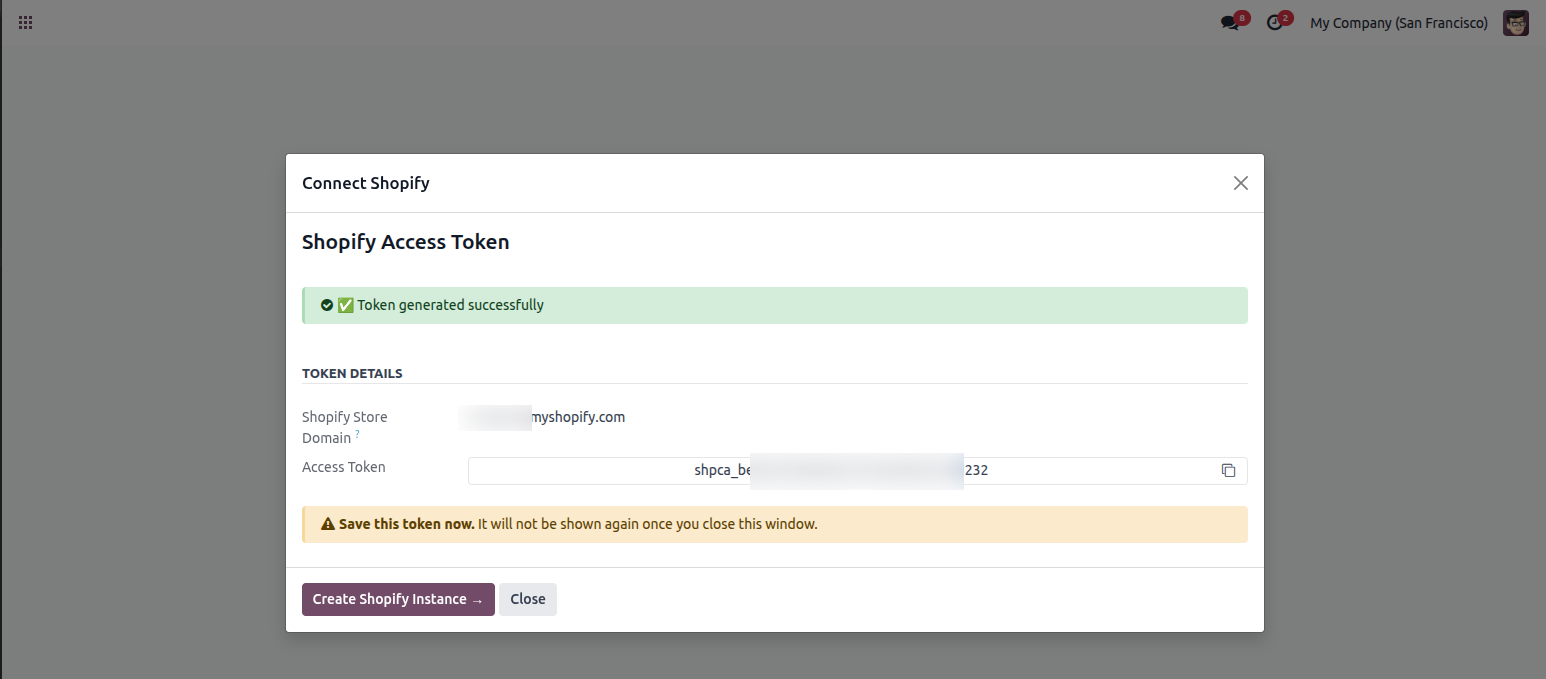
Important: Copy the access token immediately using the copy icon next to the token field. This is the only time it will be shown — once the wizard is closed, the token is cleared from storage.
9. Create the Shopify Instance
After the token is generated you have two options:
Option A — Create Instance Immediately (Recommended)
- Click Create Shopify Instance → in the wizard.
- The instance configuration wizard opens, pre-filled with your store domain, API key, shared secret, and access token.
- Enter an Instance Name and select the Company.
- Click Create to verify your credentials and complete the setup.
Option B — Save Token and Create Instance Later
- Copy the token and store it securely, for example in a password manager.
- Click Close to dismiss the wizard.
- When ready, go to Shopify → Configuration → Instances → New and paste the token into the Password field.
Note: For multiple stores, create a separate app for each store and repeat this process.