Webhook Configuration
- The purpose of the webhook configuration is that we can import the real time data from the WC store to Odoo.
- We provide webhook for Product, Orders, Customer & Coupons.
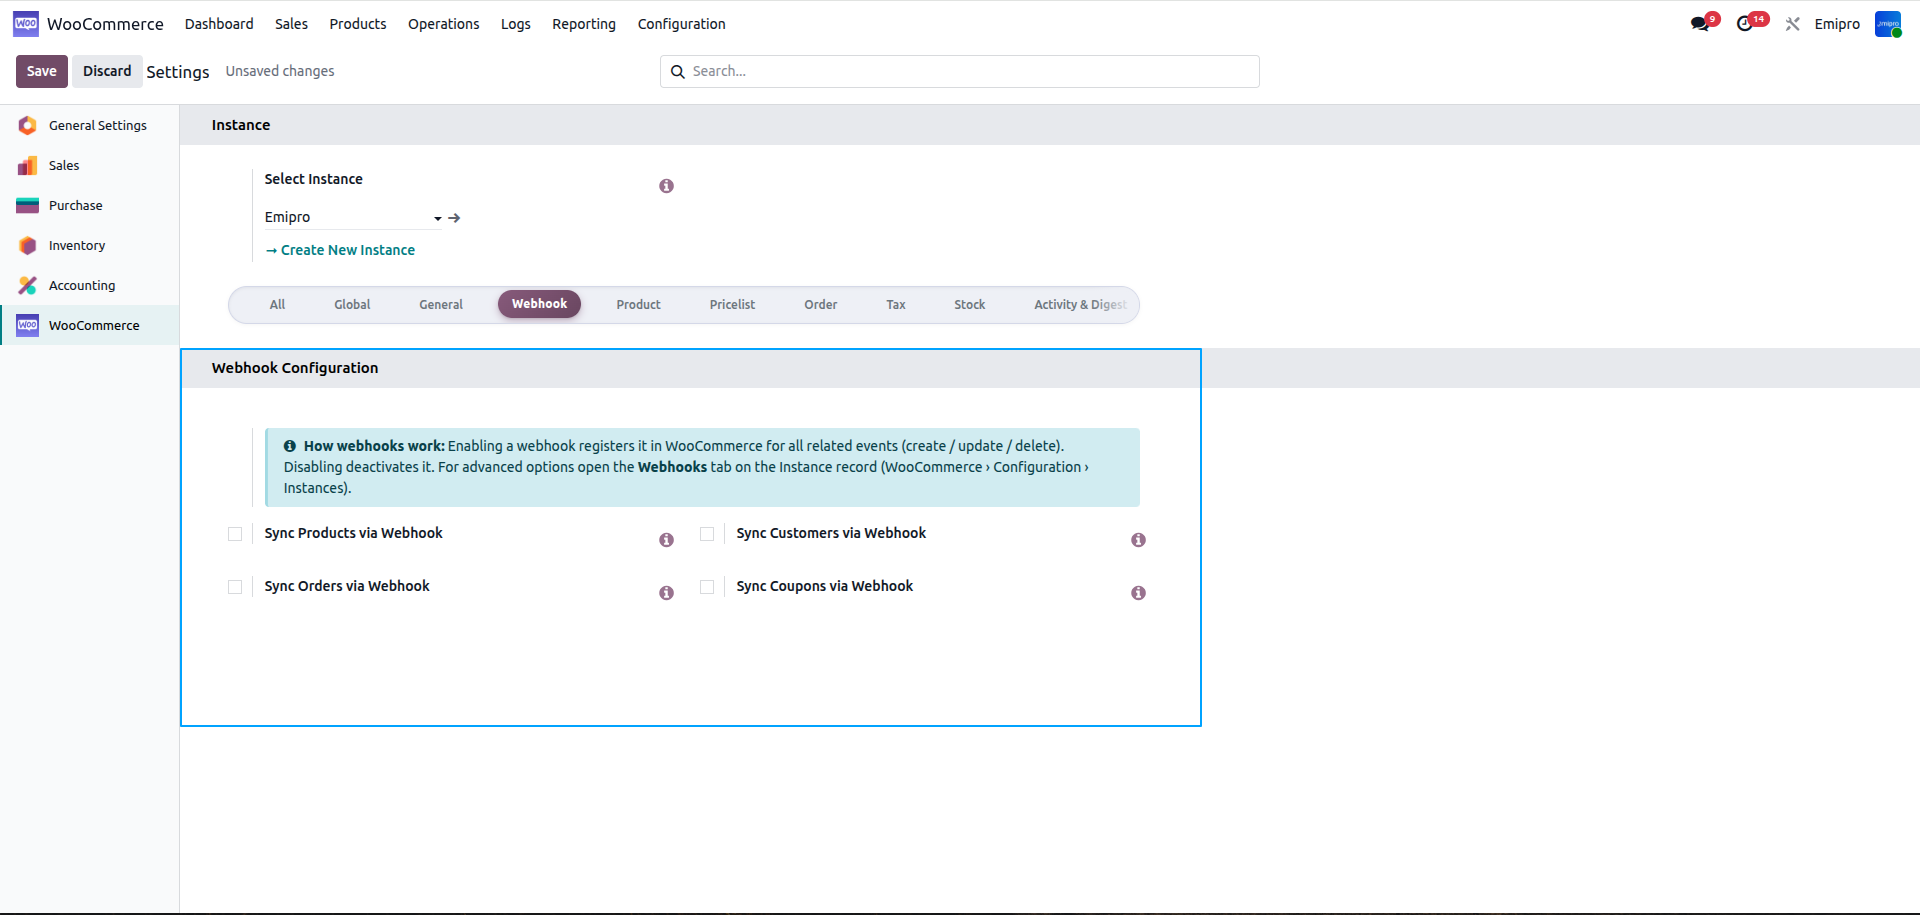
Manage Products via Webhooks
-
After you have activated the feature, if any new product is created in your WooCommerce store it will automatically get imported to Odoo.
- When Product Created/Updated
- If you configure the product create/update webhook, While product is created in the WooCommerce store it will create a product queue and then sync the product in Odoo.
- While the product is updated in WooCommerce store it will create a product queue and then update product data in Odoo.
- When Product Deleted
- If a product is available in WooCommerce layer and while trash/delete this product in WooCommerce store, it will archive this product in WooCommerce layer.
- When Product Restored
- While restoring this product in the WooCommerce store, it will unarchive(active) this product in the WooCommerce layer.
- When we activate the webhook for a product, it will generate the queue in real time.
- We need to process these queues.
- We can process this queue either manually or automatically.
Manual Process:
- Queue will be generated and at the top side there will be an option of “Process Queue Manually”
-
After that the queue gets processed.
- It will change its status from Draft to Done.
- It will change its status from Draft to Fail. Than check the log lines and process the queue again.
Automatic Process:
- To process the queue automatically you can configure the schedule action, Process Product queue that will automatically process the queue.
- You can follow below mentioned steps:
-
Activate Debug Mode–> Write down Scheduled action on dashboard–> Do the filter of WooCommerce–>Process product queue
-
In this schedule action you will found the option of an action details:
- Scheduler USer: Set an user as per your requirement
- Execute Every: 45 min. (It is advisable to set minimum 45 min, in order to avoid the conflict)
- Next Execution Date: Set the date as per your requirement
Please note that in the connector if the queue is available in the draft state or failed state then it will not create a new queue instead of that everytime system updates the data in the draft or failed queue. So it is advisable to process the draft ques and delete the failed queues before performing the new operations/ generating the new queue.
Please note that the queue will automatically get deleted from the connector after 7 days.
Manage Orders via Webhooks
-
After you have activated the feature, if any new order is placed in your WooCommerce Store it will automatically get imported to Odoo.
- When order is Created/Updated
- If you configured order create/update webhook, While order is created in WooCommerce store it will create order queue and then sync the order in Odoo.
- While the order is updated in WooCommerce store it will create an order queue and then update order in Odoo.
- When order is Deleted
- If an order exists in Odoo as a shipped order and this order delivery is done, while delete order in WooCommerce store it will create an order queue and then only add a log note in the transfer message section.
- If an order exists in Odoo as an unshipped order and this order delivery is not done, while delete order in WooCommerce store it will create an unshipped order queue and then cancel order in Odoo.
Manual Process:
- Queue will be generated and at the top side there will be an option of “Process Queue Manually”
-
After that the queue gets processed.
- It will change its status from Draft to Done.
- It will change its status from Draft to Fail. Than check the log lines and process the queue again.
Automatic Process:
- To process the queue automatically you can configure the schedule action, Process Product queue that will automatically process the queue.
- You can follow below mentioned steps:
-
Activate Debug Mode–> Write down Scheduled action on dashboard–> Do the filter of WooCommerce–>Process order queue
-
In this schedule action you will found the option of an action details:
- Scheduler USer: Set an user as per your requirement
- Execute Every: 45 min. (It is advisable to set minimum 45 min, in order to avoid the conflict)
- Next Execution Date: Set the date as per your requirement
Please note that in the connector if the queue is available in the draft state or failed state then it will not create a new queue instead of that everytime system updates the data in the draft or failed queue. So it is advisable to process the draft ques and delete the failed queues before performing the new operations/ generating the new queue.
Please note that the queue will automatically get deleted from the connector after 7 days.
Please note that do not activate the scheduler and Webhook at the same time for order import operation. It will create a conflict. So it is advisable either activate the webhook or activate the scheduler
Manage Customers via Webhooks
-
After you have activated the feature, if any new customer is created in your WooCommerce Store it will automatically get imported to Odoo.
- When Customer is Created/Updated
- If you configure the customer create/update webhook, While customer is created in WooCommerce store it will create a customer queue and then sync the customer in Odoo.
- While the customer is updated in WooCommerce store it will create a customer queue and then update customers in Odoo.
- When Customer is Deleted
- If you configure the Deleted webhook, While a customer is deleted in WooCommerce store it will delete a customer queue in Odoo.
Manual Process:
- Queue will be generated and at the top side there will be an option of “Process Queue Manually”
-
After that the queue gets processed.
- It will change its status from Draft to Done.
- It will change its status from Draft to Fail. Than check the log lines and process the queue again.
Automatic Process:
- To process the queue automatically you can configure the schedule action, Process Product queue that will automatically process the queue.
- You can follow below mentioned steps:
-
Activate Debug Mode–> Write down Scheduled action on dashboard–> Do the filter of WooCommerce–>Process customers queue
-
In this schedule action you will found the option of an action details:
- Scheduler USer: Set an user as per your requirement
- Execute Every: 45 min. (It is advisable to set minimum 45 min, in order to avoid the conflict)
- Next Execution Date: Set the date as per your requirement
Please note that in the connector if the queue is available in the draft state or failed state then it will not create a new queue instead of that everytime system updates the data in the draft or failed queue. So it is advisable to process the draft ques and delete the failed queues before performing the new operations/ generating the new queue.
Please note that the queue will automatically get deleted from the connector after 7 days.
Manage Coupons via Webhooks
-
After you have activated the feature, if any new coupons are created in WooCommerce it will automatically get imported to Odoo.
- When Coupon is Created/Updated
- If you configure coupon create/update webhook, While a customer is created in WooCommerce store it will create a coupon queue and then sync the coupon in Odoo.
- While the coupon is updated in WooCommerce store it will create a coupon queue and then update coupons in Odoo.
- When Coupon is Deleted
- If a coupon is available in WooCommerce layer and while trash/delete this product in WooCommerce store, it will archive this coupon in WooCommerce layer.
- When Coupon is Restored
- While restoring this coupon in WooCommerce store, it will unarchive(active) this coupon in WooCommerce layer.
Manual Process:
- Queue will be generated and at the top side there will be an option of “Process Queue Manually”
-
After that the queue gets processed.
- It will change its status from Draft to Done.
- It will change its status from Draft to Fail. Than check the log lines and process the queue again.
Automatic Process:
- To process the queue automatically you can configure the schedule action, Process Product queue that will automatically process the queue.
- You can follow below mentioned steps:
-
Activate Debug Mode–> Write down Scheduled action on dashboard–> Do the filter of WooCommerce–>Process customers queue
-
In this schedule action you will found the option of an action details:
- Scheduler USer: Set an user as per your requirement
- Execute Every: 45 min. (It is advisable to set minimum 45 min, in order to avoid the conflict)
- Next Execution Date: Set the date as per your requirement
Please note that in the connector if the queue is available in the draft state or failed state then it will not create a new queue instead of that everytime system updates the data in the draft or failed queue. So it is advisable to process the draft ques and delete the failed queues before performing the new operations/ generating the new queue.
Please note that the queue will automatically get deleted from the connector after 7 days.
Important Insight of Web-hooks
- If by any chance, Webhook deliveries from WooCommerce Store to Odoo fails for 5 consecutive times, the configured webhook will be disabled by WooCommerce store without any notification.
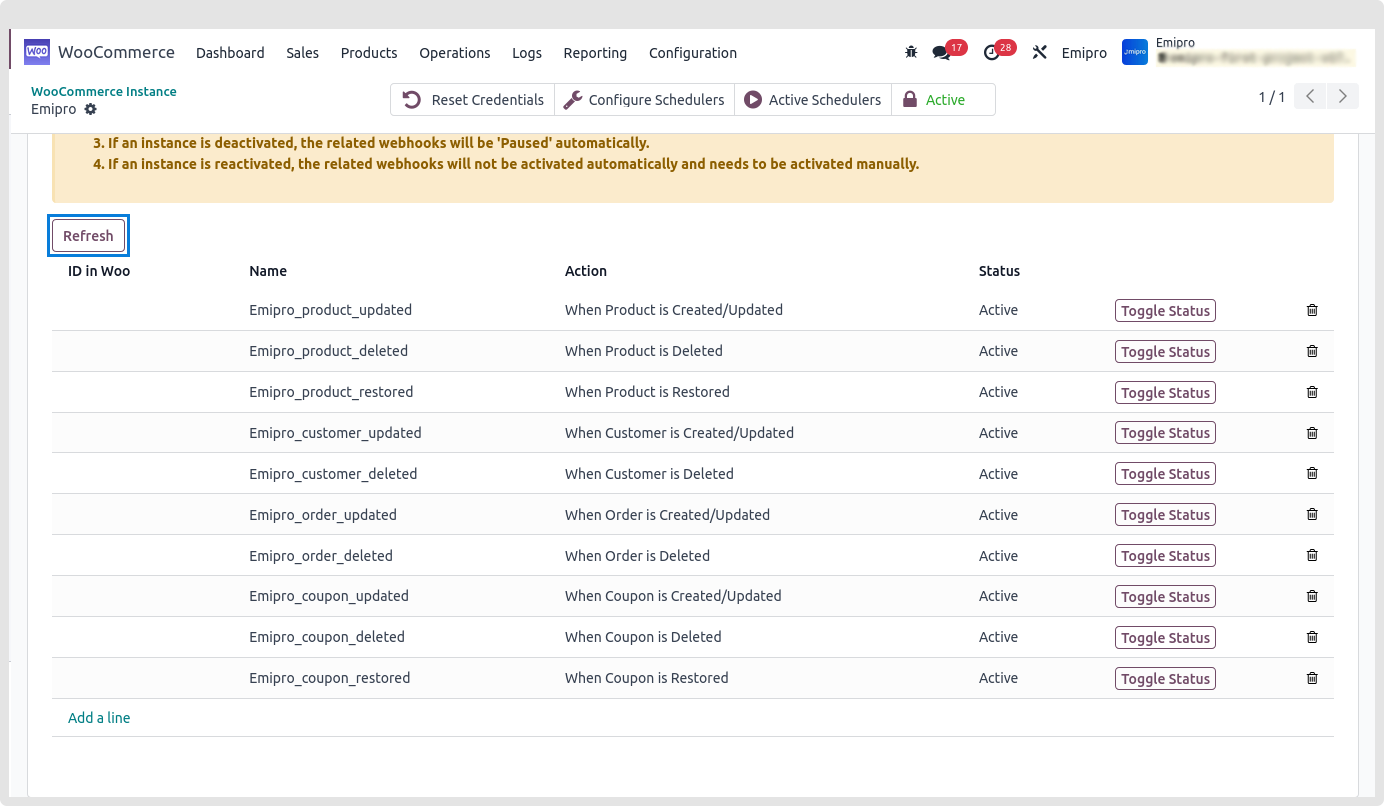
- If you observe any such discrepancy, please use the refresh button shown below, to get the updated status of the webhooks.
- If an instance is deactivated, the related webhooks will be ‘Paused’ automatically.
- If an instance is reactivated, the related webhooks will not be activated automatically and needs to be activated manually.
Webhook functionality other than Odoo.Sh
-
In case of web-hooks if you are operating with on premise or other than odoo sh and if you are using more than one database in the server, reponse of webhook might not be received by intended database which will hamper the workings of the webhook.
-
In this case, it is required to add DB-Filter in the server.
-
You can refer below mentioned link for detailed information.
https://odoo-development.readthedocs.io/en/latest/admin/dbfilter.html